
Brakes and the surrounding components are integral to keeping a vehicle road legal and suitable for travelling across the country.
This guide looks at everything you will need to know about brake fluid and changing it when necessary.
What is brake fluid?
Brake fluid is a type of hydraulic liquid that is used in brake and clutch systems in many types of vehicles.
It is an important part of the braking process. When a driver applies force to the brakes, the fluid amplifies the force to help slow the vehicle – as well as acting as a lubricant in the system and prevents corrosion to other crucial components.
By helping to transfer and increase the force a driver applies to the brake pedal, it helps improve the safety of the vehicle.
Brake fluids are normally glycol-ether or silicone-based and are designed to have a high boiling point.
This is because the braking process can create intense heat quickly – especially during an emergency stop.
Topping up and replacing the fluid are an important part of owning a vehicle, and something that should be done on a regular basis.
What is a brake fluid change?
Also known as a brake fluid flush, or brake fluid replacement, a brake fluid change is the process of removing the old liquid and adding some fresh, clean solution.
It is an important part of regular car maintenance, and something that can either be done at home or at a local trusted garage.
Over time, brake fluid absorbs moisture from the air, which leads to its decreased effectiveness in the braking process and helping fight corrosion.
The car owner’s manual will outline the type of brake fluid your vehicle will need and how often you should do it.
Brake fluid change cost
A brake fluid change at a mechanics in the UK will cost from £50 to £80 – although this can be significantly more for higher spec models.
This price will include both the new fluid and any work that is carried out at the garage.
A higher quality brake fluid and replacing the old solution will come with a higher price tag of over £100.
Drivers should also be aware that if the fluid hasn’t been changed in a while, then there could also be damage to other parts of the braking system – and this can come with a much higher cost.
How often should you change brake fluid?
Car owners should change their vehicle’s brake fluid every two years, or every 24,000 miles.
However, this can vary depending on the make and model of the vehicle, quality of the brake fluid, and driving style.
In some cases, owners will need to have the brake fluid changed every year during their MOT or service. Book your MOT and Service Plan today.
![]()
How to change brake fluid
Changing brake fluid is a delicate process and something that should only be carried out if you know what you are doing.
If you are unsure, call for a Mobile Mechanic or visit a local garage who can do this for you.
However, if are going to do this yourself, make sure you are parked on a level surface in a well-ventilated area. If you want to avoid fluid going on your driveway, it might be worth using a large cover.
Here are the steps you will need to take:
- Preparation: The first step is make sure the parking brake is working and loosen the lug nuts on the wheels. You’ll then need to use a car jack and stands to ensure that all four wheels are safely off the ground.
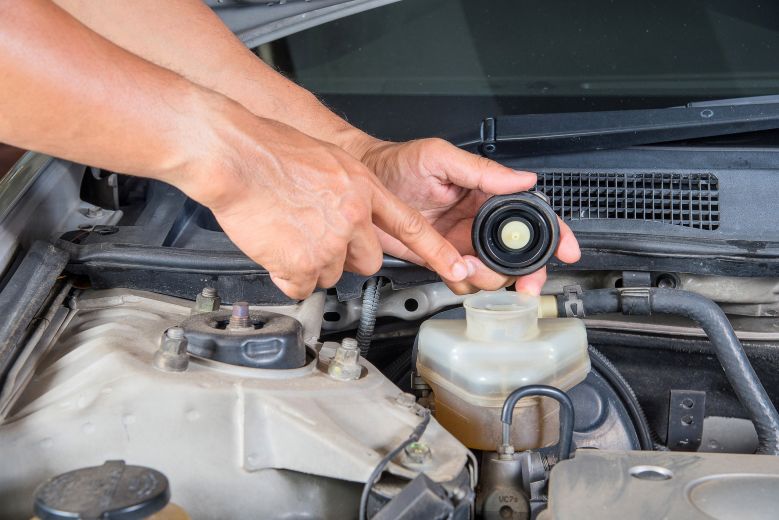
- Locating the brake fluid reservoir: Open the bonnet and locate the fluid reservoir with the brake symbols (see image above). It will normally be high up the engine on the driver’s side of the vehicle. Before opening, clean the area around it.
- Removing old brake fluid: You will need to use a siphon/transfer pump, large syringe or turkey baster and take out as much of the old fluid as possible.
- Refilling with new brake fluid: After purchasing the correct solution (outlined in the owner’s manual), fill up the reservoir to the suggested limit. This will be marked on the inside of the cylindrical tube.
- Bleeding the brake system: Starting with the rear wheels, you’ll need to locate the brake calliper and bleeder valve. Attach a clear tube onto the valve that leads into an old container. With the help of someone, press the brakes on and off and then hold it down. Old fluid and trapped air. Close the valve while the brake is pressed down. This will need to be repeated on all four wheels.
- Top up if necessary: Before you take the car off the jack and supports, check that the fluid level hasn’t dropped – and add more solution if is needed. Also, remember to tighten up the lug nuts.
- Testing the brakes: Lower the vehicle and before setting off test that the brakes feel firm when pressure is applied. The next step is to test the brakes at low speed in a quiet area with little or no traffic (or other road users).
Once the process is done and your vehicle is safe to drive, you can take the old brake fluid to your local recycling centre where you can dispose of it correctly.
For car owners who are not confident carrying out this work, it is best to ask a Mobile Mechanic or take it to a local garage.
If you have any questions about brake fluid, or how to change it, then leave your comments below.

RAC Breakdown Cover
Limited Time Offer
*£7 a month for new, single vehicle Basic cover. ^For 1 nominated vehicle when added to Extra or Complete cover. New customers only. Ends 29/04/24. 7am.


